

Chapter 3: Creating Streaming Media
This chapter describes how to use RealProducer to convert standard audio and video into streaming RealMedia. The entire conversion process is known as a "recording session." You will learn how to create a recording session from a variety of input sources and how to monitor your recording session.
The RealProducer Main Window
Before you begin to create RealMedia content, let's briefly tour the different components of the RealProducer main window. This window is where you create, start, view, and stop a recording session.
The RealProducer Main Window
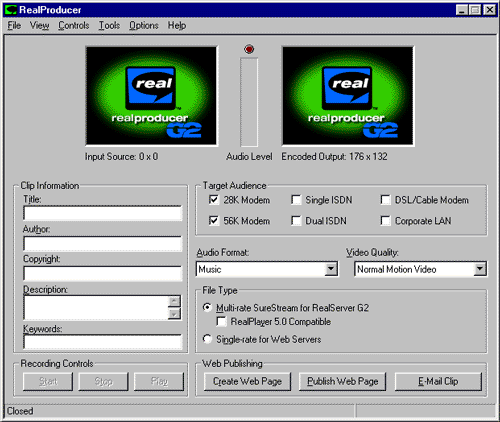
The upper section of the window is where you monitor the recording process. "Viewers" show you the input video and the recorded output during a recording session. Meanwhile, an audio level indicator gives you a visual representation of the audio track.
The middle section lists all necessary information about the final RealMedia file. Details such as clip information, the target audience, audio format, video quality, and the type of stream being recorded are found here.
On the bottom are the recording controls. These controls allow you start, stop, and play the current recording session. Next to them are the publishing controls. They are explained in "Publishing to the Internet".
Recording Your Clips
RealProducer includes a number of simple wizards to guide you step-by-step through the recording process. These recording wizards are specifically designed to:
- convert existing audio and video files into RealMedia files
- record RealMedia files from media capture devices
- broadcast live, streaming content using a RealServer
If you are more familiar with the recording process, you can bypass the wizards and set up the recording process manually. This option is discussed later in this chapter.
Recording from Media Files
This section describes how to record a RealMedia file from different types of existing media files using the recording wizard.
Only the following audio and video formats can be converted into RealMedia clips using the RealProducer:
- Audio (.au)
- Waveform audio (.wav)
- Video for Windows (.avi)
- QuickTime for Windows (.mov); requires DirectX 6.0
To create a RealMedia file from an existing file using the recording wizard:
- Select New Session from the File menu. (If the wizards are disabled, you can select File>Recording Wizards>Record From File and go to step 3.)
The New Session - Choose Recording Wizard dialog opens.
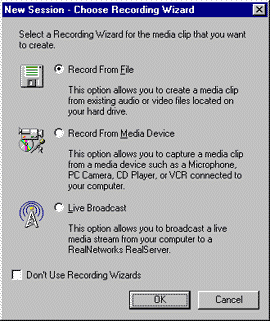
- Select Record from File and click OK.
The recording wizard opens to the Record From File page.
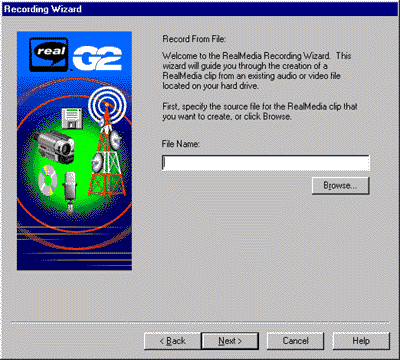
- Use the Browse button to locate the audio or video file that you will use as the source for your recording. Or, simply type in the path and file name for the source file.
- Click Next.
The RealMedia Clip Information page opens.
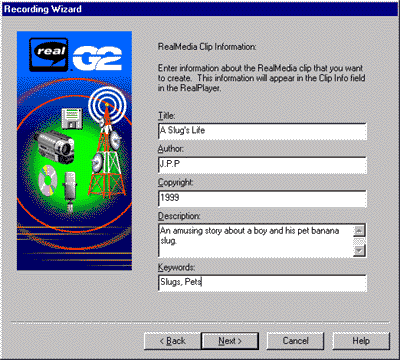
- Enter the following information in the provided spaces. This information will help your audience find your clip. You may leave them blank.
Title-the title of the clip
Author-the name of the clip's creator
Copyright-year and owner of the clip's copyright
Description-a brief summary of the clip's contents
Keywords-words that you think your audience would use to search for your clip. See "Creating Keywords" for tips on creating your keywords.
- Click Next.
The File Type page opens.
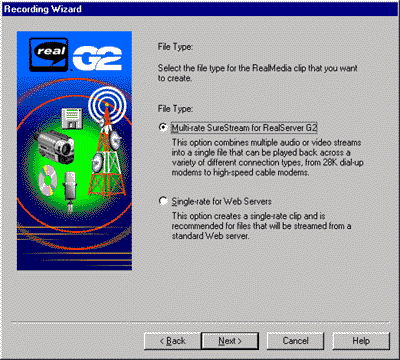
- Select the type of RealMedia file you want to create: SureStream or Single Rate. For more information on SureStream files, see "About SureStream".
- Click Next.
The Target Audience page opens.
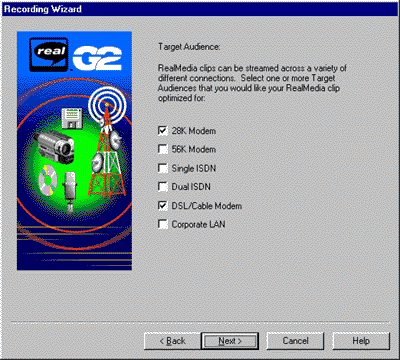
- Select the connection speed for your audience. You may make more than one selection (up to two) if you are creating a SureStream file.
- Click Next.
The Audio Format page opens if your source file contains audio. If not, skip the next step.
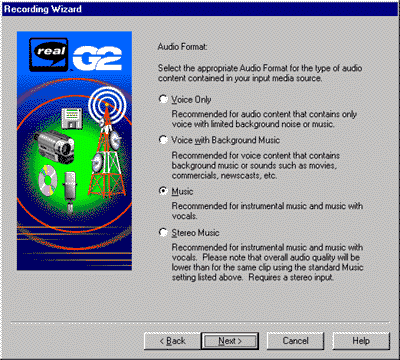
- Select the type of audio that your file consists of (if applicable), and click Next.
 |
Note |
|
You can only select the Stereo Music format if your
audio source is in stereo.
|
The Video Quality page opens if your source file contains video. If not, skip the next step.

- Select the video quality for your output file (if applicable), and click Next.
 |
Tip |
|
These options are based on the content of your video.
You can choose to sacrifice clarity for smoother motion,
or vice versa. Choosing Normal Motion is good for most
clips.
|
The Output File page opens.
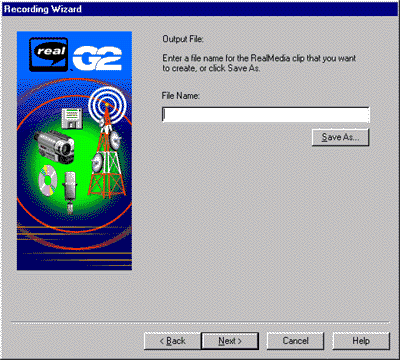
- Enter the name and directory of your final output file.
The output file must have a .rm extension (for example, myfile.rm).
- Click Next.
The Prepare to Record Page opens.
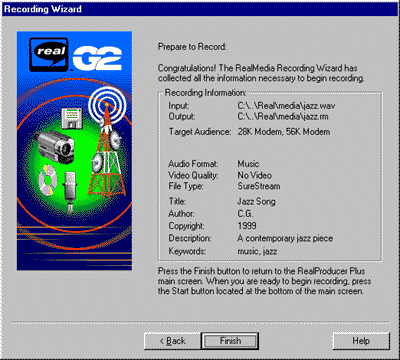
- Review all information about the recording session. If it is correct, click Finish. You can use the Back button to reverse through the wizard and change any information.
After clicking Finish, you are returned to the RealProducer main window. Every option you selected during the wizard appears in the window. If you are recording video input, the Input Source viewer shows the first frame.
- You can change any recording options at this point, or simply click Start to begin recording.
- Click Stop to quit recording before the source file ends.
A dialog box opens asking you to confirm ending the recording, but the session continues to record.
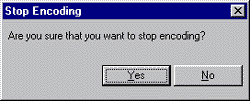
- Click Yes to close the dialog box and stop the recording.
|
|
Tip |
|
You can press the Shift key and click Stop together to
stop recording instantly and bypass the confirmation
dialog box. Press Ctrl+Shift and click Stop to quickly
abort the recording with no output file saved.
|
The Recording Complete dialog box opens.
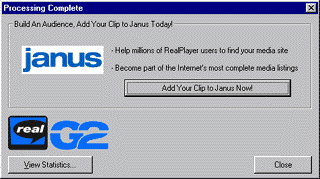
You have the following choices:
- Click Add Your Clip to Janus Now! to place your clip on a list of clips hosted by RealNetworks. See "Adding Your Clip to Janus" for more information.
- Click View Statistics to view complete information about your recording session. See "Monitoring Recording Statistics" for more information.
- Click Close to return to the main window.
- In the RealProducer main window, click the Play button to open your RealPlayer and play the RealMedia file.
Recording from Media Devices
This section describes how to record a RealMedia file from different types of media devices using the recording wizard.
With RealProducer, you can record from many types of media devices: live microphone input, live video camera input, audio tape, video tape, Digital Video Disks (DVD), or satellite feeds.
Before you begin the recording session, make sure that your media device is properly connected and is working correctly.
To create a RealMedia file from a media device using the recording wizard:
- Select New Session from the File menu. (If the wizards are disabled, you can select File>Recording Wizards>Record From Media Device and go to step 3.)
The New Session - Choose Recording Wizard dialog opens.
- Select Record from Media Device and click OK.
The recording wizard opens to the Record From Media page.
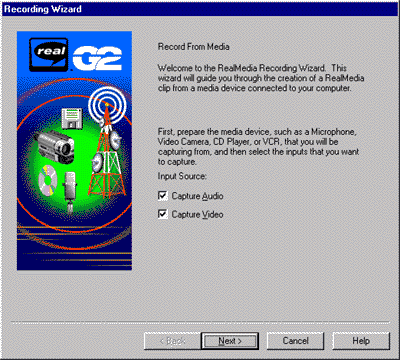
- Select the Input Source(s): audio or video.
- Click Next.
The RealMedia Clip Information page opens.
- Enter the Title, Author, Copyright, Description, and Keywords in the provided spaces.
This information will help your audience find your clip. You may leave these fields blank.
- Click Next.
The File Type page opens.
- Select the type of RealMedia file you want to create: SureStream or Single Rate. For more information on SureStream files, see "About SureStream".
- Click Next.
The Target Audience page opens.
- Select the connection speed for your audience. You may make more than one selection (up to two) if you are creating a SureStream file.
- Click Next.
The Audio Format page opens if you selected an audio device. If not, skip the next step.
- Select the type of audio that your content consists of (if applicable).
|
|
Note |
|
You can only select the Stereo Music format if your
audio source is in stereo.
|
- Click Next.
The Video Quality page opens if you selected a video device. If not, skip the next step.
- Select the video quality for your output file (if applicable), and click Next.
|
|
Tip |
|
These options are based on the content of your video.
You can choose to sacrifice clarity for smoother motion,
or vice versa. Choosing Normal Motion is good for most
clips.
|
The Output File page opens.
- Enter the name and directory of your final output file.
The output file must have a .rm extension (for example, myfile.rm).
- Click Next.
The Prepare to Record Page opens.
- Review all information about the recording session. If it is correct, click Finish.
After clicking Finish, you are returned to the RealProducer main window. Every option you selected during the wizard appears in the window. If you are recording video input, the Input Source viewer shows the video source.
- You can change any recording options at this point, or simply click Start to begin recording.
- Monitor your audio and/or video input, and click Stop to quit recording.
A dialog box opens asking you to confirm ending the recording, but the session continues to record.
- Click Yes to close the dialog box and stop the recording.
|
|
Tip |
|
You can press the Shift key and click Stop together to
stop recording instantly and bypass the confirmation
dialog box. Press Ctrl+Shift and click Stop to quickly
abort the recording with no output file saved.
|
The Recording Complete dialog box opens. This dialog shows you some information about your RealMedia file.
You have the following choices:
- Click Add Your Clip to Janus Now! to place your clip on a list of clips hosted by RealNetworks. See "Adding Your Clip to Janus" for more information.
- Click View Statistics to view complete information about your recording session. See "Monitoring Recording Statistics" for more information.
- Click Close to return to the main window.
- In the RealProducer main window, click the Play button to open your RealPlayer and play the RealMedia file.
Broadcasting Live Content
This section describes how to broadcast live from different types of media devices using the recording wizard.
In addition to creating RealMedia files from your media sources, you can use RealProducer to broadcast your live content directly over the Internet or a corporate LAN. You must have access to a RealServer in order to use this feature.
To broadcast live content using the recording wizard:
- Select New Session from the File menu. (If the wizards are disabled, you can select File>Recording Wizards>Live Broadcast and go to step 3.)
The New Session - Choose Recording Wizard dialog opens.
- Select Live Broadcast and click OK.
The recording wizard opens to the Live Broadcast page.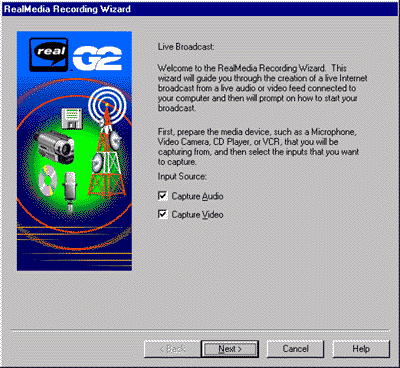
- Select the Input Source(s): audio or video.
- Click Next.
The Media Clip Information page opens.
- Enter the Title, Author, and Copyright, Description, and Keywords in the provided spaces.
This information will help your audience find your clip. You may leave these fields blank.
- Click Next.
The File Type page opens.
- Select the type of RealMedia you want to create: SureStream or Single Rate. For more information on SureStream files, see "About SureStream".
- Click Next.
The Target Audience page opens.
- Select the connection speed for your audience. You may make more than one selection (up to two) if you are using SureStream.
- Click Next.
The Audio Format page opens if you selected an audio device. If not, skip the next step.
- Select the type of audio that your content consists of (if applicable).
|
|
Note |
|
You can only select the Stereo Music format if your
input audio is in stereo.
|
- Click Next.
The Video Quality page opens if you selected a video device. If not, skip the next step.
- Select the video quality for your output file (if applicable), and click Next.
|
|
Tip |
|
These options are based on the content of your video.
You can choose to sacrifice clarity for smoother motion,
or vice versa. Choosing Normal Motion is good for most
clips.
|
The RealServer Information page opens.
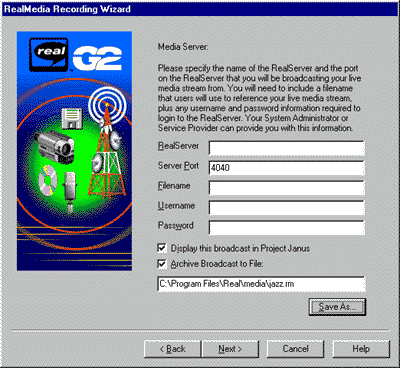
- In this step, you will enter information about the RealServer that you will use to broadcast your streaming media.
- Enter the name and port number for the RealServer G2 that you will use for your broadcast.
- Enter a Filename that users will use to access the broadcast. For example, broadcast.rm (the file must have a .rm extension).
- Enter your Username and Password for the server, if required.
- If you want your broadcast to be listed in a public Web site hosted by RealNetworks, select Display This Broadcast in Project Janus.
- You may also specify a filename and location for an archive of your broadcast. Select Archive Broadcast to File and enter a file name, or click the Save As button to browse for the archive file. The file must also have a .rm extension.
- Click Next.
The Prepare to Record Page opens.
- Review all information regarding the broadcast. If it is correct, click Finish.
After clicking Finish, you are returned to the RealProducer main window. Every option you selected during the wizard appears in the window. If you are recording video input, the Input Source viewer shows the video source.
- You can change any recording options at this point, or simply click Start to begin broadcasting.
- Monitor your audio and/or video input, and click Stop to finish the broadcast.
A dialog box opens asking you to confirm ending the broadcast, but the session continues to record.
- Click Yes to close the dialog box and stop the recording.
|
|
Tip |
|
You can press the Shift key and click Stop together to
stop recording instantly and bypass the confirmation
dialog box. Press Ctrl+Shift and click Stop to quickly
abort the recording.
|
The Recording Complete dialog opens. This dialog recaps all information regarding your broadcast.
- Click View Statistics to view complete information about your recording session. See "Monitoring Recording Statistics" for more information.
- Click Close to return to the main window.
Recording Without Wizards
Although using RealProducer's recording wizards allow you to easily create RealMedia content, after time you'll likely be able to do without them. RealProducer allows you to disable the RealMedia recording wizards and create a new recording session without using a wizard.
Disabling the Wizards
This section describe how to disable the recording wizards. You can also toggle the wizards on or off with the Preferences dialog. For more information, see "New Session Start-Up Options".
To disable the recording wizards:
- Choose New Session from the File menu.
The New Session - Choose Recording Wizard dialog opens.
- Select the Don't use Recording Wizards option.
- Click OK.
The New Session dialog opens. You can still run the recording wizards at any time by choosing File>Recording Wizards from the RealProducer main window.
Using the New Session Dialog
The New Session dialog allows you to create a new recording session without using the recording wizards. You can still create the same types of RealMedia clips:
- from a media file to a RealMedia file
- from a media device to a RealMedia file
- a live RealMedia broadcast
The New Session Dialog

There are two main sections of this dialog: the Input Source area and the Output area. You specify the type of source (media device or file) you will record in the Input Source area. You specify the type of RealMedia recording (file or live broadcast) in the Output area.
The following procedure shows you how to use the New Session dialog and create RealMedia clips.
To create RealMedia using the New Session dialog:
- Click New Session from the File menu.
The New Session dialog opens.
- In the Input Source section, select the source for your recording session.
Media Device-select the media devices that you will record from: audio and/or video.
File-enter the directory and filename for the source file, or click the Browse button to locate the file.
- In the Output section, select what type of recording you are creating.
RealMedia File-enter the directory and filename for the recorded file, or click the Save As button to choose a directory and filename.
Live Broadcast-enter the name, port, username, and password of the RealServer that you will use for your broadcast. Plus, you must enter a filename that users will use to access the broadcast.
If you want your broadcast to be listed in a public Web site hosted by RealNetworks, select Display the Broadcast in Project Janus.
You may also specify a filename and location for an archive of your broadcast. Select Archive Broadcast to File, then enter a filename.
- Click OK.
The New Session dialog closes, returning to the RealProducer main window.
- Enter the Title, Author, Copyright, Description, and Keywords for your output. These fields are optional.
- Select the File Type, either Single Rate or SureStream. For more information on SureStream files, see "About SureStream".
- In the Target Audience section, select the connection speed for your audience. You may select more than one target audience (up to two) if you are recording with SureStream.
- In the Audio Format section, select the type of audio contained in your source (if any).
|
|
Note |
|
You can only select the Stereo Music format if your
audio source is in stereo.
|
- In the Video Quality section, select the type of video contained in your source (if any).
- Click Start to begin the recording process.
- Click Stop to end the recording.
|
|
Tip |
|
You can press the Shift key and click Stop together to
stop recording instantly and bypass the confirmation
dialog box. Or, press Ctrl+Shift and click Stop to quickly
abort the recording.
|
The Recording Complete dialog box opens. This dialog shows you some information about your RealMedia file.
You have the following choices:
- If you are recording a file, click Add Your Clip to Janus Now! to place your clip on a list of clips hosted by RealNetworks. See "Adding Your Clip to Janus" for more information.
- Click View Statistics to view complete information about your recording session. See "Monitoring Recording Statistics" for more information.
- Click Close to return to the main window.
- In the RealProducer main window, click the Play button to open your RealPlayer and play the RealMedia file.
Monitoring Recording Statistics
The Statistics window is a useful tool that allows you to monitor the performance of your recording session.
You can watch general statistics, audio-only statistics, or video-only statistics. If you are using SureStream, statistics are shown for each stream that RealProducer creates.
To monitor recording statistics:
- After you have created a recording session, choose Statistics from the View menu.
The Statistics window opens. You can return to the RealProducer window without closing the Statistics window.
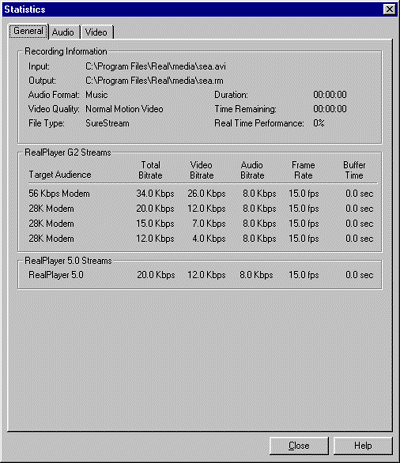
- Start recording, noting the top section of the Statistics window. Here is where you will find basic information about your recording session such as:
- type of input (file or media device)
- where the output file or broadcast is located
- audio format and video quality
- type of the file (SureStream or Single Rate)
You also find information that constantly changes, such as:
- duration of the clip for live broadcasts
- time remaining in the clip for static recording
- real time performance
- Also monitor the general, audio, and video information located at the bottom of the Statistics window. These statistics are described later in this section.
Monitoring Real Time Performance
A main feature of the statistics dialog is its ability to show the performance of your recording session.
This statistic compares the time it took to record your clip to the time it takes to play the input. For example, if your input is a 10 second video clip and it takes RealProducer 5 seconds to process the clip, the Real Time Performance would be 50%.
Any value near or above 100% means that your computer may not be able to process data as fast as it is received, and the session may fail due to lack of computing resources. During live encoding, over 100% will fail. The error message you receive reads "not enough resources to maintain live stream."
General Statistics
These statistics give you information about each target audience selected during the creation of the recording session. If you are recording a Single Rate clip, only one stream appears. If you are using SureStream, all streams are listed for each target audience.
See the table below for more details about these statistics.
Using General Statistics
| Statistic |
Description |
| Target Audience |
target bit rate of you audience |
| Total Bit Rate |
total bit rate of the clip |
| Video Bit Rate |
bit rate of the video stream |
| Audio Bit Rate |
bit rate of the audio stream |
| Frame Rate |
frames per second of video |
| Buffer Time |
number of seconds needed before the clip can be played |
Audio Statistics
These statistics give you information about the audio codecs (compression/decompression algorithms) used to create the audio streams. More than one codec appears if you are using SureStream.
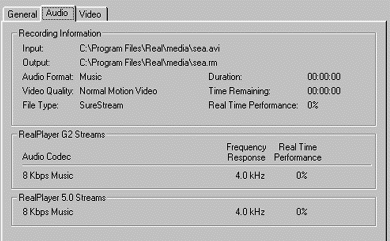
See the table below for more details about these statistics.
Using Audio Statistics
| Statistic |
Description |
| Audio Codec |
codec being used to convert audio stream |
| Frequency Response |
highest frequency found in the recorded audio |
| Real Time Performance |
approximate percentage of your computer's audio recording speed compared to real time audio playing speed |
Video Statistics
These statistics give you information about the video codecs (compression/decompression algorithms) used to create the video streams. More than one codec appears if you are using SureStream.

See the table below for more details about these statistics.
Using Video Statistics
| Statistic |
Description |
| Video Codec |
codec used to convert video |
| Video Bit Rate |
bit rate of the video |
| Frame Rate |
frames per second of video |
| Quality Index |
video quality affected by your computer processor's recording speed; 100 is best, and values less than 80 reflect reduced quality |
| Real Time Performance |
approximate percentage of your computer's video recording speed compared to real time video playing speed |
Copyright © 1998-1999
RealNetworks
For information on RealNetworks' technical support, click here.
Comments on this document? Click here.
This file last updated on 06/23/99 at 14:19:24.