Because there is no single best process for delivering all types of streaming audio and video, this chapter shows you various tips on how to get the most out of your RealProducer recording session.
This chapter discusses how to improve RealProducer performance, use RealProducer more effectively, produce high-quality audio and video, edit file information, and promote your content.
A number of factors can influence how much of your system's resources are used during a recording session. Use these tips to get the best performance possible.
By disabling the input source window, the output source window, and the audio level meter during live recording, you can lower the amount of processing power needed to record. Consequently, you can increase the frame rate of your recorded file and decrease the time it takes to record your clip.
Viewers that are currently active are designated with a checkmark:
RealProducer has features that allow you to more easily use RealProducer and increase efficiency while recording your media clips. Here you will learn how to select different video outputs, and how to drag-and-drop clips into RealProducer.
Even though only one Output Viewer is shown in the main window, you can use it to view the different video streams that are being created when you record a video clip. Using this feature, you can monitor the true output as it will appear to the audience.
The video stream with the highest bandwidth appears in the Output Viewer.
A menu lists all video streams being creating in this recording session.
RealProducer supports drag-and-drop recording. This feature allows you to quickly convert an input audio or video file into RealMedia.
This opens a new session with path and file name information entered appropriately.
This section describes how to successfully create quality sound for RealMedia clips. It gives you overall audio tips, describes audio sampling rates, and shows you how to use the audio level meter.
Follow these tips in order to get the best quality from your different audio sources.
This allows you to use a sound editor to adjust the amplitude of your signal to maximize the available dynamic range. If you do not adjust the signal, the resulting RealMedia file may sound flat.
The following sampling rates for your source audio are supported for this version of the product. For fuller sound, use the higher sampling rates and a better audio codec.
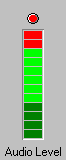
While you record RealMedia clips, you can monitor the Audio Level to be sure you are encoding the optimal dynamic range. Green indicates a normal reading. Red warns that you are close to an over-modulated input. The best sound quality will occur when the top red bar is often lit but the clipping indicator (the red light above the meter) is never lit.
Clear the clipping indicator during recording by clicking on it. This allows you to track if audio clipping is occurring without watching the audio level constantly.
This section describes how to successfully create quality video for RealMedia clips. Follow these tips in order to get the best quality from the different types of video sources. You can also use RealProducer's video noise filter to improve quality.
In order to get high quality output, your video source should meet the following requirements organized by video type.
However, if you captured an AVI file on the same machine as RealProducer, there is typically no problem.
Video noise appears as distortions (blotches) in your input video. This noise can appear in video for a variety of reasons: poor capture cards, cameras, or storage.
The video filter removes this noise from the input video prior to recording. Therefore, you get higher quality input video which will generally result in high quality output clips.
RealProducer gives you the ability to change information about a saved RealMedia file. You can change either clip information (title, author, copyright, description, or keywords) or file properties (allow recording, allow download, indexing, and audience rating).
This feature is useful if you want to create a media clip, but don't want to enter keywords or a description. You can edit them into a clip at a later date.
The Edit RealMedia File dialog opens with any current information listed.
Once you have created a high-quality streaming media clip, you want people to watch and listen to it. RealProducer gives you the opportunity to add keywords to your clips and place your broadcast on a streaming media guide hosted by RealNetworks.
A new feature in this version of RealProducer is the ability to add keywords to your clip. The keywords allow you to give search engines a way to recognize your streaming media.
Since RealMedia clips do not contain text like normal Web pages, the only way that your audience can search for your clip is through the keywords that you specify. Therefore, choosing the best keywords is vital. Three to four words should be all you need.
For example, if you are creating a RealVideo clip of ABC Corporation's CEO, Pat Jones, giving the fourth-quarter financial report, the keywords might be:
ABC Corporation, Pat Jones, Q4, report, investments, finance
A good way for people to learn about your media clip is by using Janus. This online guide is hosted by RealNetworks and gives you access to all Internet users.
When you are creating a clip, you will be asked if you want to register with Janus. If you choose to, you will be sent to a Web page that asks you to enter information about your clip. This information will point users to your clip and where it is being streamed from.
The Add RealMedia File To Janus dialog opens to the last directory where you saved RealMedia files.
Your Web browser opens to RealNetworks' Project Janus Web site. Any information that you entered when you created your clip is automatically entered in the provided spaces.